
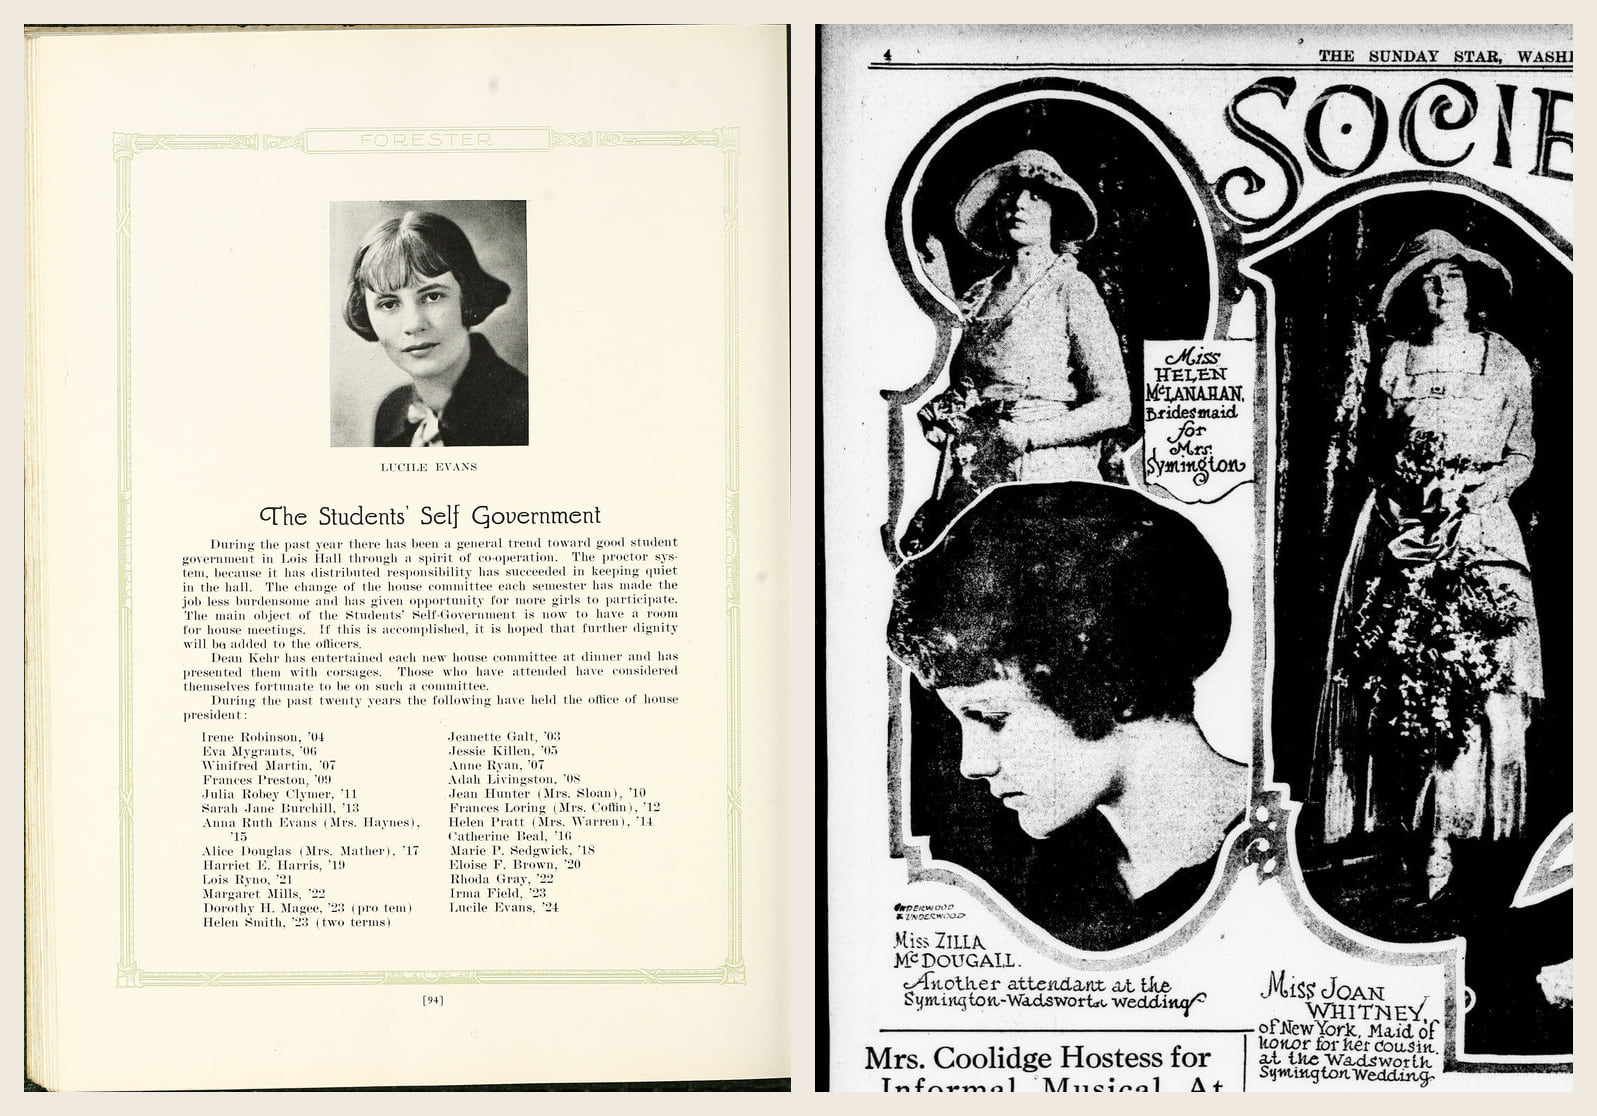
Old yearbooks turn up at the school or its district office, the town's public library, the local historical society and the class alumni group. Online, try the Internet Archive (free), Classmates (free with an account), then Ancestry and e-yearbook.com (paid).
Once you find the photo, get the biggest copy you can. Then soften its printed dots before you restore it, because a restore keeps the dots unless you deal with them first.
Where old yearbooks turn up
Start with the school's name and the year your parent or grandparent finished there, usually the year they turned 17 or 18. Yearbooks are often filed under their own title, like The Forester or The Topic, so search for the school name as well as the word “yearbook”. Then try these, free ones first (prices as of October 2026):
- 01The school or its district office, which may keep a shelf of old yearbooks. Ask before you scan or photograph a page.
- 02The public library in the same town, usually its local history room, then the town's historical society and the school's alumni association. Looking is free.
- 03The Internet Archive's yearbook collection, free online. Libraries, colleges and historical societies have uploaded tens of thousands of yearbooks there. Search for the school's name and the town's.
- 04Classmates: free to search and page through its high school yearbooks once you make an account.
- 05Ancestry's U.S., School Yearbooks collection: $24.99 a month for a U.S. Discovery membership after a 14-day free trial, which renews unless you cancel. It's free on the computers of public libraries that subscribe to Ancestry Library Edition; ask at the desk.
- 06e-yearbook.com: $29.95 a year, or $4.95 a month paid three months upfront, with no free trial and no refunds. Browsing is free, so check your school and year are there first. Its page images are about 800 by 1,100 pixels, so a single portrait comes out small.
Naturalization and passport files can hold an ancestor's photo too.
Get the biggest copy you can
On a website, use the download button where there is one. A screenshot keeps only the pixels that fit on your screen, so if you have to take one, zoom in until the face fills the screen first.
With the book in your hands, scan the page at 600 dpi or more; our guide to scanning at home has the settings. A phone works if the portrait fills the frame and the phone is held flat above the page.
Then zoom to 100%. On a sharp capture you'll see a fine grid of dots. That's how yearbooks and newspapers printed photographs: the picture was broken into dots of ink, larger in the shadows and smaller in the light.
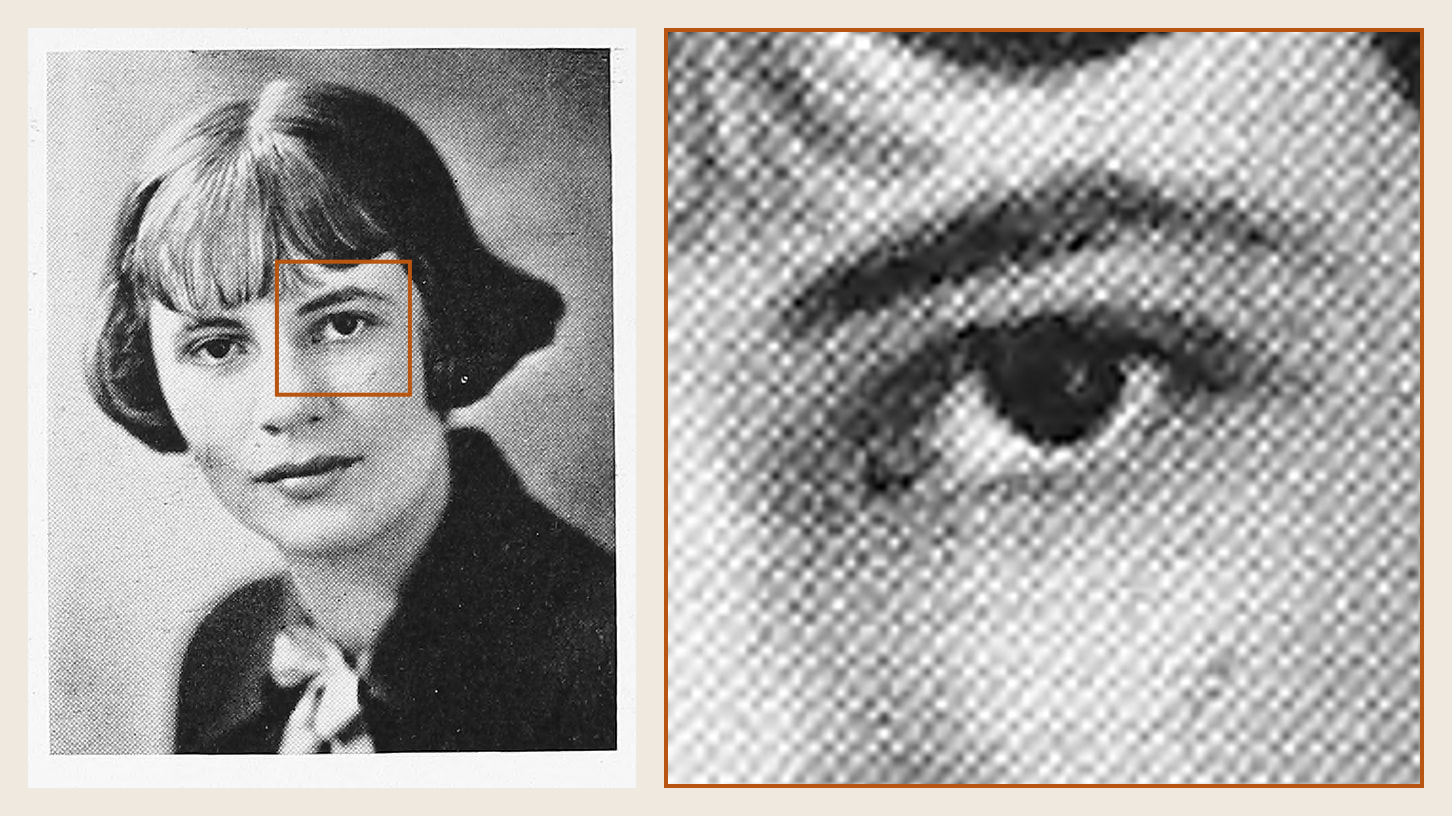
A downloaded page may show no dots at all, if it was scanned small or compressed. A 1923 Indiana high school yearbook on the Internet Archive shows only a faint texture. If you can't see dots at 100%, skip the softening below.
A restore keeps the dots
A restore is built to mend damage and keep everything else the way it is. To the restore, the dots are part of the picture.
Restored straight from the scan, the 1925 portrait came back with its dots sharper and darker than on the page, and a paid restore kept them too. Softened first, the same portrait came back as a smooth photograph.
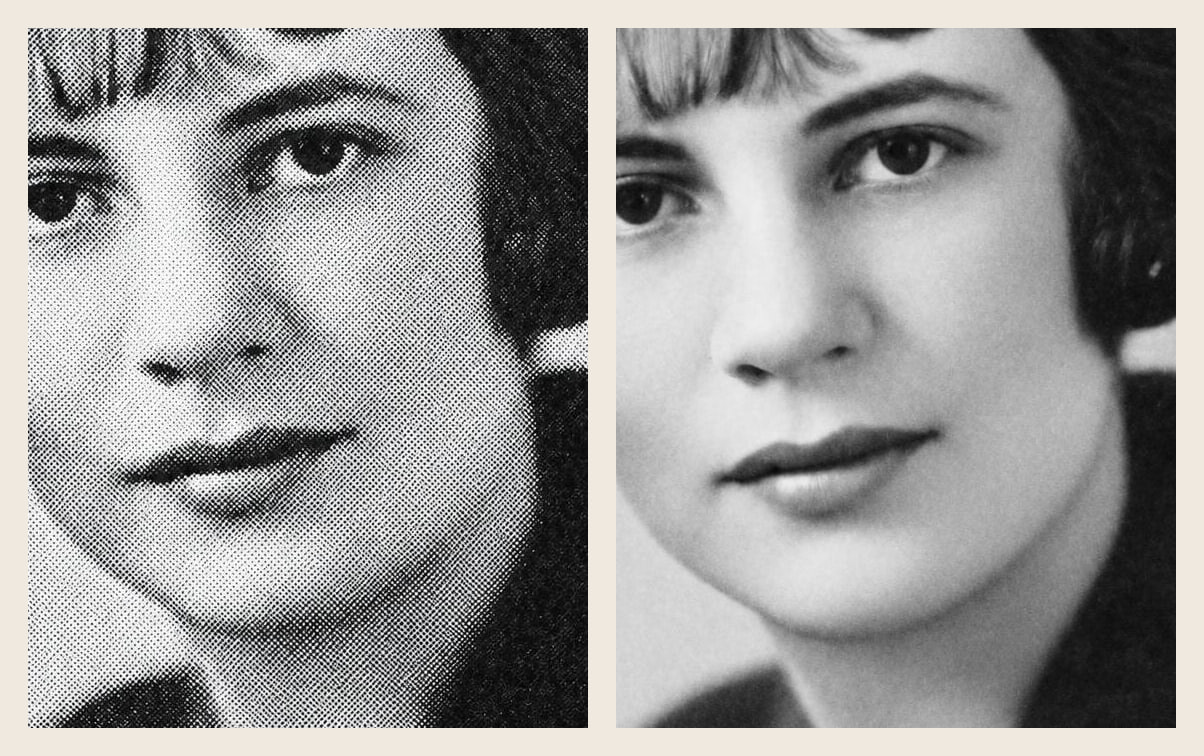
Soften the dots, then restore
- 01On a computer, go to photopea.com, a free photo editor that runs in your browser with nothing to install. Choose File, then Open, and pick your scan.
- 02Click the magnifying glass near the bottom of the left-hand toolbar, then click on the face until you can see the dots.
- 03Choose Filter, then Blur, then Gaussian Blur. With Preview ticked, type 2 in the Radius box for a yearbook scanned at 600 dpi, or 4 for a newspaper.
- 04Watch the face. If dots still show, go up a little; if they're gone, try a little lower. Stop at the lowest number that hides them and click OK.
- 05Choose File, then Export As, then JPG, and save it under a new name. Keep the original scan as it is.
If your scanner software has a descreen setting (Epson calls it Descreening, Canon calls it Descreen), turning it on does the same job while it scans. Turn sharpening off at the same time.
If you'd rather skip the photo editor, ask for it in the note instead. On FixFade the box is called “Anything we should know?”, and on the 1925 portrait this line worked about as well as softening: “This is a printed yearbook photo made of halftone dots. Smooth the dot pattern away so it looks like the original continuous-tone photograph.”
You can try either on your photo: 2 free watermarked previews a day, no card needed, about a minute each. Unwatermarked restores use credits, from $19 for 25.
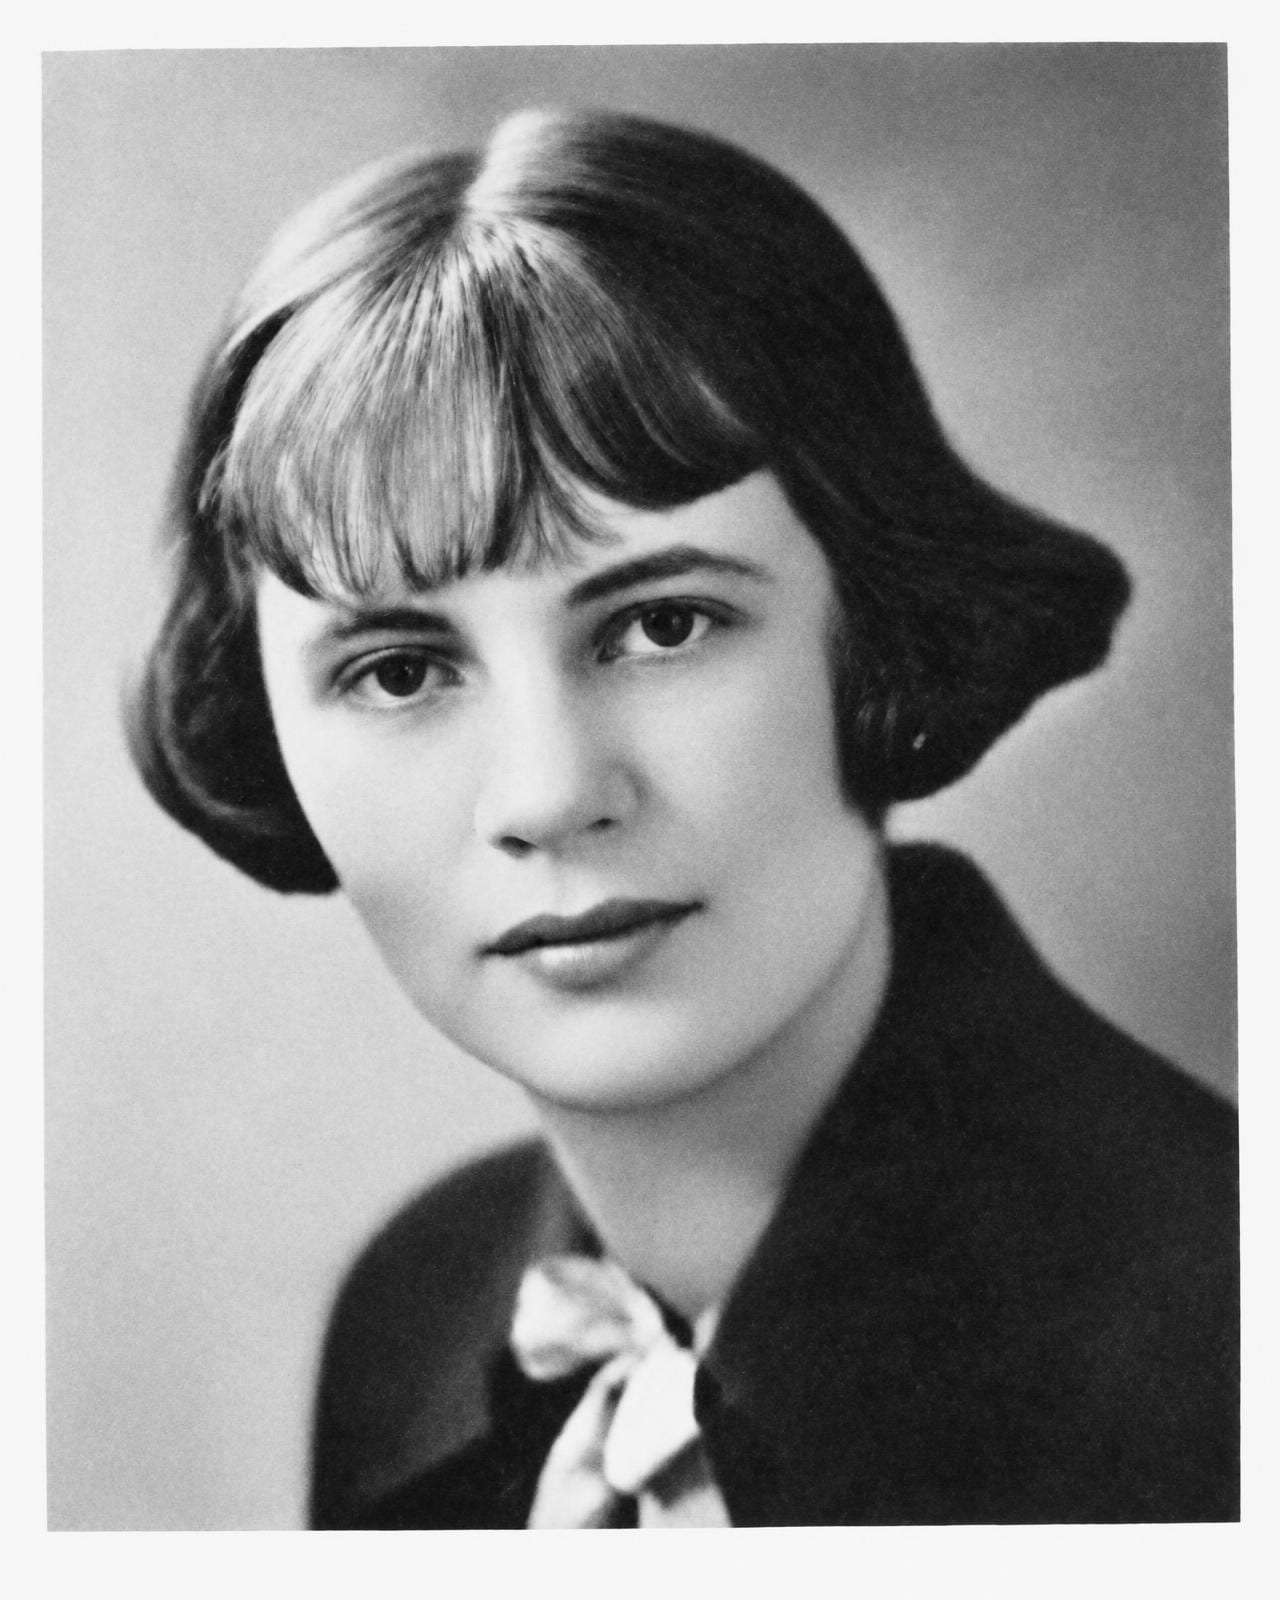
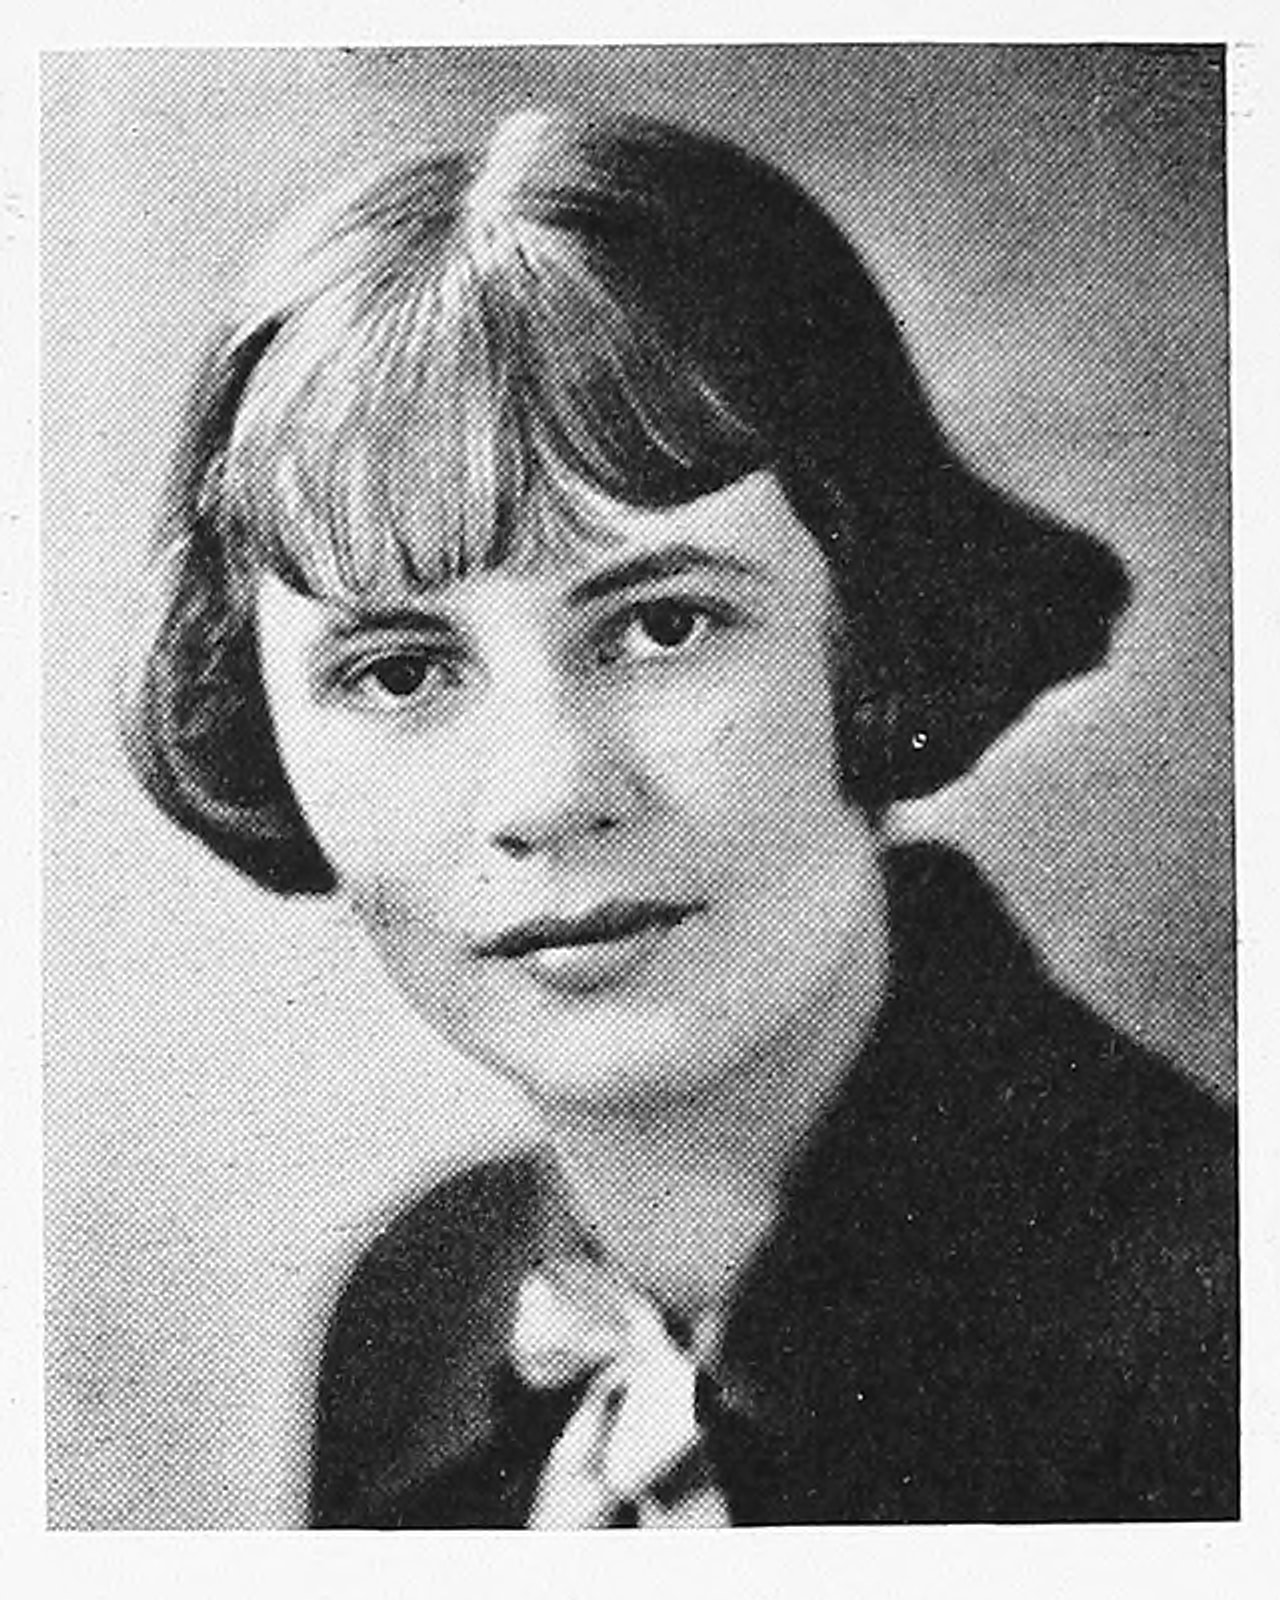
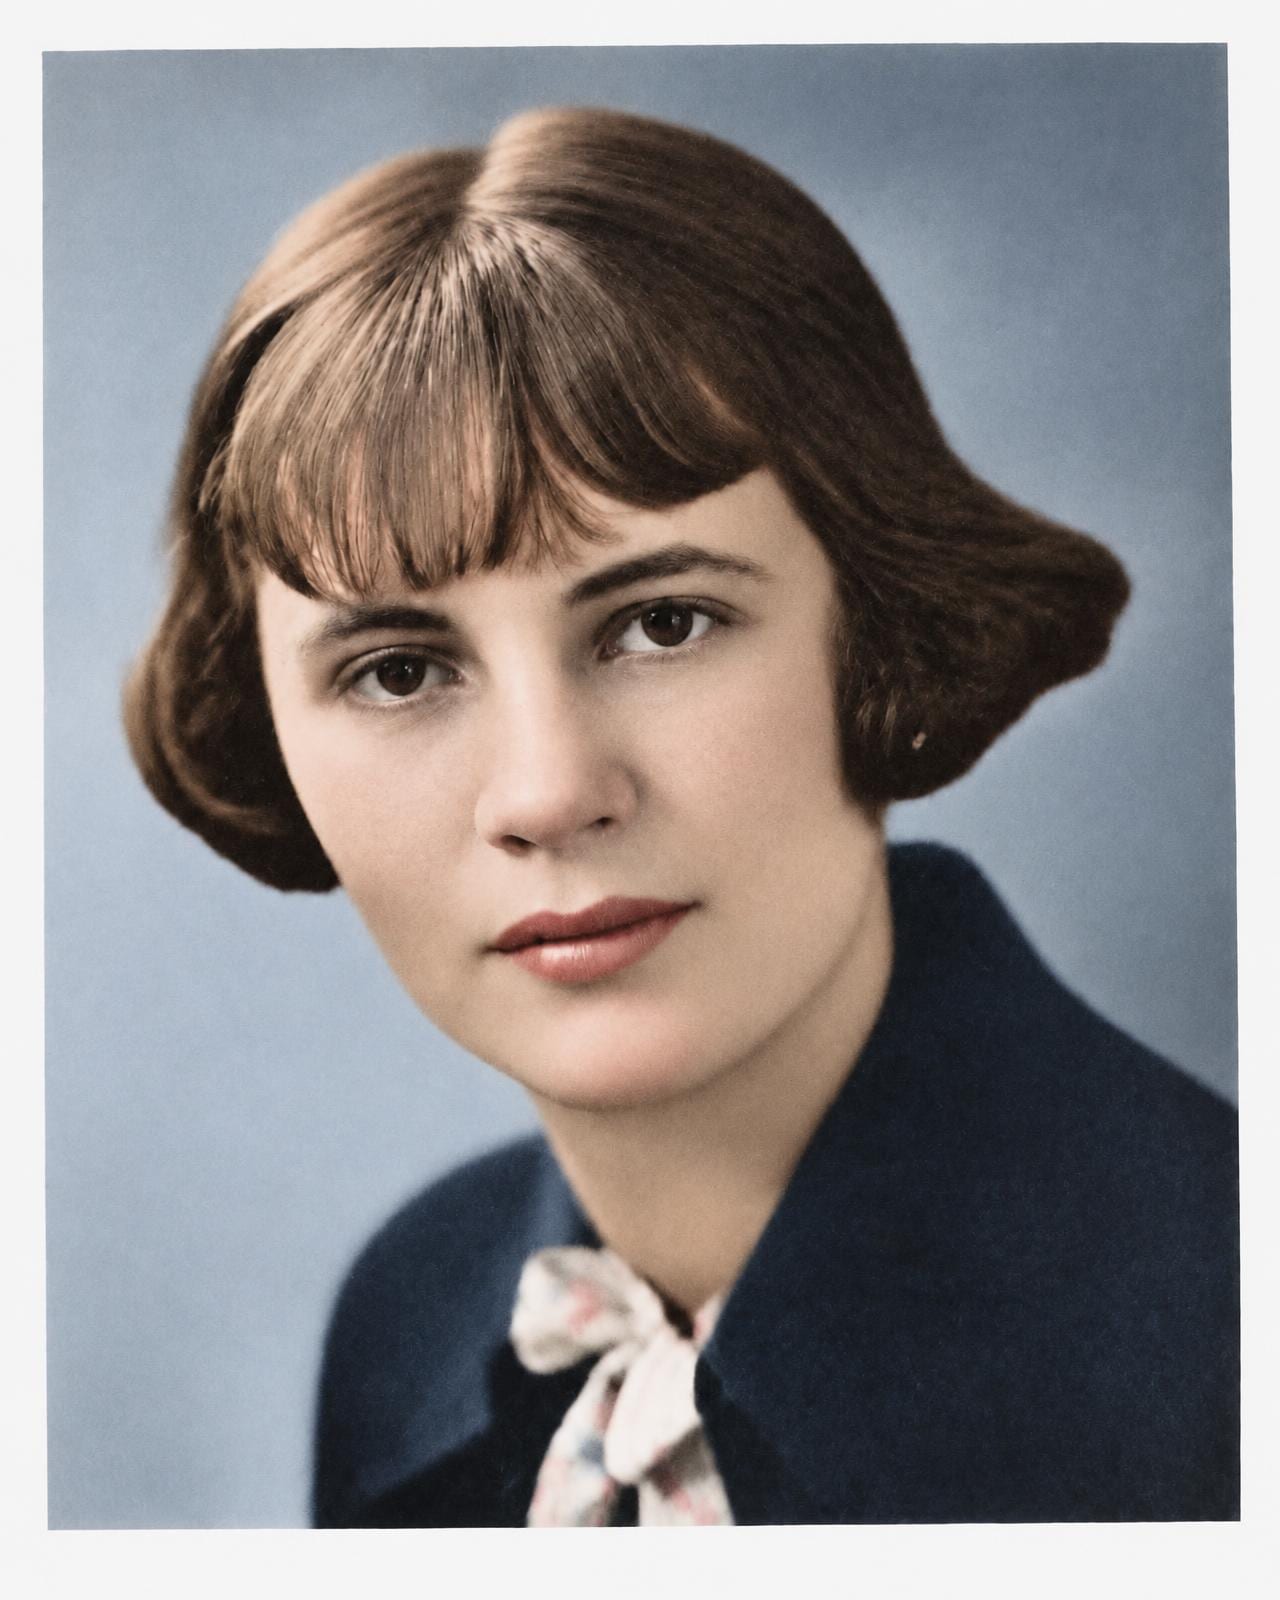
Compare the restore with the page, too. This one firmed up her jaw and darkened her lips a little. If a change like that bothers you, write what to keep in the note (“keep her face shape exactly as printed”) and run it again. The rest works like any old photo, as our restoring guide explains.
For a newspaper clipping, soften and skip the note
Newspapers printed photos with coarser dots than yearbooks, which is why the blur starts higher. The free pages at the Library of Congress's Chronicling America were scanned from microfilm, which can lose the middle greys too. In the portrait below her face is chalk-white and her hair solid black. A restore cleans that up but can't bring back greys the film never kept.
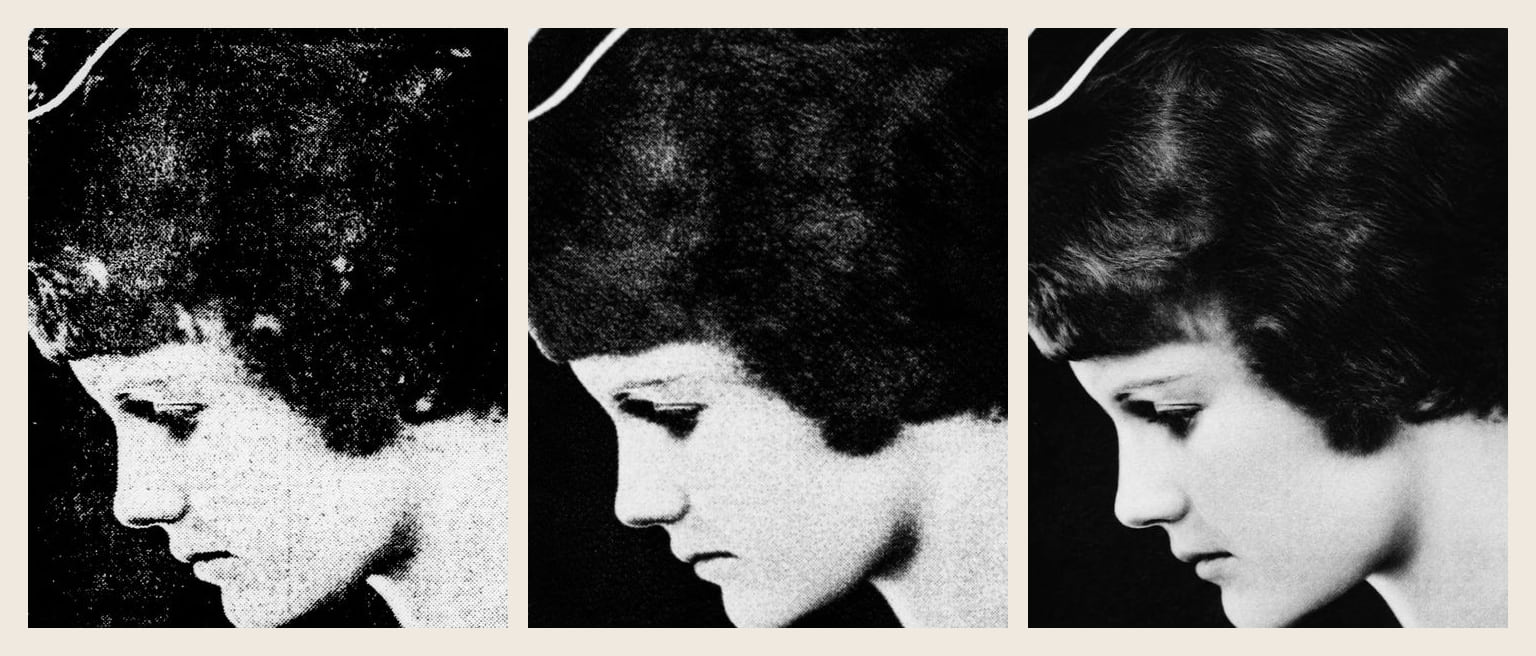
On this portrait the softened restore kept the newsprint look and cleaned the speckle. The note version looks like a studio print, but the combed waves in her hair aren't on the page. The restore drew them. For a clipping, soften first and leave the note out.
If the photo is for a death notice, the size and crop are in how to choose an obituary photo.
Before you upload
- You have a download or a 600 dpi scan of the page.
- At 100% you see dots: soften until they just disappear. No dots: upload it as it is.
- A yearbook, and you'd rather skip Photopea: add the note instead.
- A newspaper clipping: soften, and leave the note out.
- The face on the restore matches the face on the page.